MMC5 pinout: Difference between revisions
From NESdev Wiki
Jump to navigationJump to search
(h/t krzysiobal per Talk:) |
(q.v. https://forums.nesdev.com/viewtopic.php?t=16789) |
||
| Line 65: | Line 65: | ||
| 27 || PPU A12 || 77 || CPU R/W | | 27 || PPU A12 || 77 || CPU R/W | ||
|- | |- | ||
| 28 || PPU A13 || 78 || /ROMSEL | | 28 || PPU /A13 || 78 || /ROMSEL | ||
|- | |- | ||
| 29 || (unk. output) || 79 || M2 | | 29 || (unk. output) || 79 || M2 | ||
Revision as of 03:30, 5 December 2017
     80    51
     |     |
     .------.
  81-|      |-50
     | MMC5 |
 100-|      |-31
     \------'
      |    |
      01   30
| Pin | Function | Pin | Function | Pin | Function | Pin | Function |
|---|---|---|---|---|---|---|---|
| 1 | Amplifier Input | 51 | CPU A6 | ||||
| 2 | DAC? | 52 | CPU A7 | ||||
| 3 | Pulse Waves | 53 | CPU A8 | ||||
| 4 | VCC | 54 | CPU A9 | ||||
| 5 | PPU A0 | 55 | CPU A10 | ||||
| 6 | PPU A1 | 31 | CIRAM /CE | 56 | PRG RAM VCC | 81 | (unk. output) |
| 7 | PPU A2 | 32 | CIRAM A10 | 57 | +batt | 82 | (unk. output) |
| 8 | PPU A3 | 33 | PPU /WR | 58 | CPU A11 | 83 | PRG RAM +CE |
| 9 | PPU A4 | 34 | PPU /RD | 59 | CPU A12 | 84 | PPU D0 |
| 10 | PPU A5 | 35 | /IRQ | 60 | PRG A13 | 85 | PPU D1 |
| 11 | PPU A6 | 36 | CPU D0 | 61 | PRG A14 | 86 | PPU D2 |
| 12 | PPU A7 | 37 | CPU D1 | 62 | PRG A15 | 87 | PPU D3 |
| 13 | PPU A8 | 38 | CPU D2 | 63 | PRG A16 | 88 | PPU D4 |
| 14 | PPU A9 | 39 | CPU D3 | 64 | PRG A17 | 89 | PPU D5 |
| 15 | CHR A10 | 40 | CPU D4 | 65 | PRG A18 | 90 | PPU D6 |
| 16 | CHR A11 | 41 | CPU D5 | 66 | PRG A19 | 91 | PPU D7 |
| 17 | CHR A12 | 42 | CPU D6 | 67 | CPU A13 | 92 | (unk. output) |
| 18 | CHR A13 | 43 | CPU D7 | 68 | CPU A14 | 93 | (unk. output) |
| 19 | CHR A14 | 44 | VCC | 69 | PRG RAM A13 | 94 | CHR A0 † |
| 20 | CHR A15 | 45 | CPU A0 | 70 | PRG RAM A14 | 95 | CHR A1 † |
| 21 | CHR A16 | 46 | CPU A1 | 71 | PRG RAM 0 /CE | 96 | CHR A2 † |
| 22 | CHR A17 | 47 | CPU A2 | 72 | PRG RAM 1 /CE | 97 | CL3 † |
| 23 | CHR A18 | 48 | CPU A3 | 73 | (unk. output) | 98 | SL3 † |
| 24 | CHR A19 | 49 | CPU A4 | 74 | PRG /CE | 99 | GND |
| 25 | PPU A10 | 50 | CPU A5 | 75 | (unk. output) | 100 | Amplifier output |
| 26 | PPU A11 | 76 | PRG RAM /WE | ||||
| 27 | PPU A12 | 77 | CPU R/W | ||||
| 28 | PPU /A13 | 78 | /ROMSEL | ||||
| 29 | (unk. output) | 79 | M2 | ||||
| 30 | (unk. output) | 80 | GND | ||||
†PINS 94 thru 98: These set the cart to either CL or SL mode.
To set to CL mode:
- Connect PPU A0 from the NES to A0 on the CHR ROM.
- Connect PPU A1 from the NES to A1 on the CHR ROM.
- Connect PPU A2 from the NES to A2 on the CHR ROM.
- Connect pins 97 and 98 together.
- Leave pins 94,95 & 96 floating on the MMC5
To set to SL mode:
- Connect pin 94 of the MMC5 to A0 of the CHR ROM.
- Connect pin 95 of the MMC5 to A1 of the CHR ROM.
- Connect pin 96 of the MMC5 to A2 of the CHR ROM.
- Connect pin 98 to ground.
- Leave pin 97 floating.
In other words, CL mode passes the lowest PPU address bits straight to CHR ROM, while SL mode runs them through MMC5. SL mode allows the MMC5 to perform smooth vertical scrolling in split mode, while CL mode does not. Nearly all MMC5 cartridges use CL mode - it is not known why SL mode was not used instead: possibly ROM speed issues.
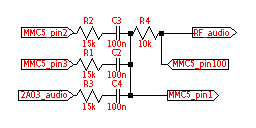
Audio circuit topology for HVC-ExROM boards:
